[n8n-template] Automated Invoice Archiving
Automatically fetch, store, and extract key information from invoices received via email from your ISP or utility provider (electricity, gas, telecom, water,…
Automatically fetch, store, and extract key information from invoices received via email from your ISP or utility provider (electricity, gas, telecom, water, etc.).The workflow saves the invoices to Google Drive (or optionally to your personal FTP/SFTP server) and logs all invoice details into Google Sheets via AI-powered extraction.
👨🏻💻GitHub: paoloronco/n8n-templates
📽️Video: AI Video Automated Invoice Archiving - YouTube
👥 n8n Community Template: Coming Soon
Setup Guide:
Before configuring the workflow, you’ll need:
- n8n instance
- Self-hosted or n8n Cloud, with access to credentials.
- Google account with:
- Gmail access
- Google Drive
- Google Sheets
- (Optional) FTP/SFTP server if you want to keep a copy of each invoice outside Google.
- LLM / AI provider
- For example OpenRouter or OpenAI, with:
- API key
- Sufficient credit / quota.
- For example OpenRouter or OpenAI, with:
- Invoice emails
- Your ISP/utility provider should send invoices from a consistent email address (e.g.,
billing@provider.com). - Invoices should be PDF attachments. Text-based PDFs work best.
- Your ISP/utility provider should send invoices from a consistent email address (e.g.,
2. Import the Workflow into n8n
- Download or copy the workflow JSON (
20-SaveInvoices-Templates.json). - In n8n, go to Workflows → Import from File / Clipboard.
- Import the JSON.
- Save the workflow (give it a clear name, e.g.,
Automated Invoice Archiving).
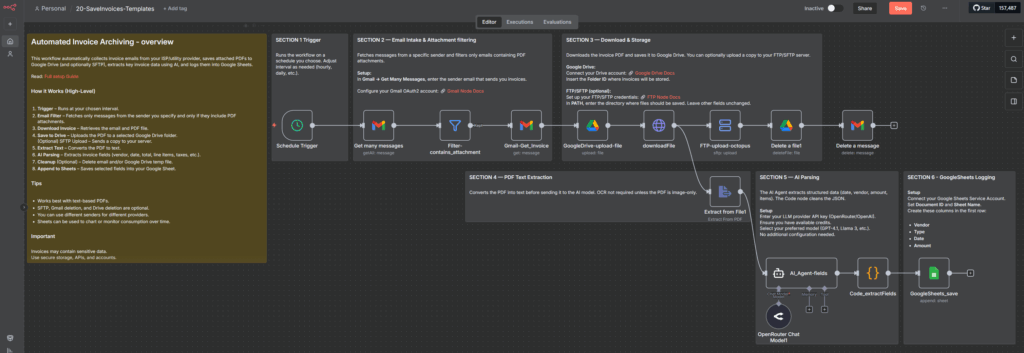
You should now see a flow that includes nodes like:
- Schedule Trigger
- Get many messages (Gmail)
- Filter-contains_attachment
- Gmail-Get_Invoice
- GoogleDrive-upload-file
- downloadFile
- FTP-upload-octopus
- Extract from File1
- OpenRouter Chat Model1
- AI_Agent-fields
- Code_extractFields
- GoogleSheets_save
- Delete a file1
- Delete a message
The sticky notes in the canvas will help you visually understand each section.
3. Configure Credentials
3.1 Gmail (OAuth2)
This workflow uses the Gmail nodes:
- Get many messages
- Gmail-Get_Invoice
- Delete a message
Steps
- In n8n, go to Credentials → New → Gmail OAuth2.
- Follow the official guide to create OAuth credentials and connect Gmail:
- Once created, select this credential in all Gmail nodes in the workflow.
Tip: Use a dedicated Gmail account or label for invoices if possible. That makes testing and monitoring easier.
3.2 Google Drive
Used by:
- GoogleDrive-upload-file — uploads the invoice PDF
- Delete a file1 — optionally cleans up the temp file from Drive
Steps
- In n8n, create a Google Drive OAuth2 credential.
- Follow:
- Open the GoogleDrive-upload-file node and select your Google Drive credential.
- In the node:
- Choose “My Drive” or your desired drive
- Set the Folder ID where you want to store invoices.
- In Google Drive, open the folder → copy the ID from the URL, e.g.
https://drive.google.com/drive/folders/ABC123...
→ the part after/folders/is the ID.
- In Google Drive, open the folder → copy the ID from the URL, e.g.
Do the same credential selection for Delete a file1.
3.3 FTP/SFTP (Optional)
Used by:
- FTP-upload-octopus
If you don’t need FTP, you can disable or remove this node. If you do:
- In n8n, create a new SFTP or FTP credential with your server details (host, port, username, password or SSH key).
- Check the official docs if needed:
- In the FTP-upload-octopus node:
- Set Protocol to
sftp(recommended) orftp. - Select your credential.
- In PATH, enter the directory where you want to store invoices, e.g.:
/home/user/invoices/
- Keep the rest of the settings as they are unless you know you need to change them.
- Set Protocol to
3.4 AI Provider (OpenRouter / OpenAI / Other LLM)
Used by:
- OpenRouter Chat Model1
- AI_Agent-fields (LangChain Agent node referencing the chat model)
This pair of nodes is responsible for turning raw PDF text into structured JSON (vendor, date, amount, line items, taxes, etc.).
Steps
- Sign up / log in with your preferred provider (e.g., OpenRouter, OpenAI).
- Obtain an API key.
- In n8n, create a new credential for that provider (e.g., OpenRouter API).
- Open the OpenRouter Chat Model1 node:
- Select your credential.
- Choose your preferred model. Suggested:
gpt-4.1,gpt-4.1-mini- or a strong
llama-3variant.
- Make sure the AI_Agent-fields node uses OpenRouter Chat Model1 as its language model (already wired in the template).
Note: The system prompt and extraction instructions are already configured in the template to return structured JSON with
vendor_name,invoice_date,total_amount,line_items, tax fields, etc. You can tweak the prompt if your invoices follow specific formats.
3.5 Google Sheets (Service Account)
Used by:
- GoogleSheets_save (append operation)
This node appends one row per processed invoice into a Google Sheet.
3.5.1 Create a Sheet
- In Google Sheets, create a new spreadsheet.
- In the first row (header), create these columns:
VendorTypeDateAmount
You can extend with more columns later (e.g., Invoice Number, Tax, etc.), but these four are what the template uses by default.
3.5.2 Set up Service Account + Access
- In Google Cloud Console, create a Service Account and enable the Google Sheets API.
- Generate a JSON key and load it into n8n as a Google API credential.
- In Google Sheets, click Share and share the document with the Service Account email (usually something like
service-account-name@project-id.iam.gserviceaccount.com) with edit access.
3.5.3 Configure the Node
- Open GoogleSheets_save in n8n.
- Select your Google API credential.
- Set:
- Document ID — from the Sheet URL
https://docs.google.com/spreadsheets/d/DOCUMENT_ID/edit#gid=...
- Sheet Name — name of the tab where data should be added.
- Document ID — from the Sheet URL
- Check the mapping: by default, the workflow maps:
Vendor←{{$json.vendor_name}}Type←{{$json.line_items[0].description}}Date←{{$json.invoice_date}}Amount←{{$json.total_amount}}You can expand this mapping to include more fields (more columns in your Sheet + corresponding mapping in the node).
4. Configure Each Node (Step-by-Step)
Now let’s walk through the main nodes in execution order and confirm what you may need to change.
4.1 Schedule Trigger
Node: Schedule Trigger
- Purpose: runs the workflow automatically.
- In this template it is set to run at a specific minute every hour.
Configure:
- Open the node.
- Adjust the interval:
- Example: every 1 hour, at minute 25.
- Or once per day at a specific time.
- Save.
4.2 Get many messages (Gmail)
Node: Get many messages
- Purpose: fetches emails from your inbox.
- Configured to:
- Use Gmail OAuth2 credential
- Filter by sender and PDF attachments.
Configure:
- Select your Gmail credential.
- Under Filters → Sender, set the email address that sends invoices, e.g.:
billing@provider.cominvoices@isp.com
- Keep downloadAttachments = true (the template already does this).
4.3 Filter-contains_attachment
Node: Filter-contains_attachment
- Purpose: ensures only messages with attachments proceed.
This node uses a simple “exists” condition on the binary data of the previous node. Normally you don’t need to change anything.
4.4 Gmail-Get_Invoice
Node: Gmail-Get_Invoice
- Purpose: fetches the full email and downloads the attachment for each selected message.
Configure:
- Make sure the Gmail credential is selected.
- Confirm
downloadAttachmentsis enabled.
The template already uses the ID from the Get many messages node, so there’s nothing else to edit.
4.5 GoogleDrive-upload-file
Node: GoogleDrive-upload-file
- Purpose: uploads the invoice PDF to a specified Google Drive folder.
Configure:
- Select your Google Drive credential.
- Under Folder ID, paste the ID of your invoice folder.
- Name pattern is already set to something like:
{{ $json.from.value[0].name }}-{{ $json.date }}- You can leave this or change it.
4.6 downloadFile
Node: downloadFile (HTTP Request)
- Purpose: downloads the file back from Google Drive based on its
webContentLinkso that it can be processed and/or uploaded to FTP.
This node should work as-is; no configuration is usually required.
4.7 FTP-upload-octopus (Optional)
Node: FTP-upload-octopus
- Purpose: saves the invoice PDF to your FTP/SFTP server.
Configure:
- Set Protocol (
sftprecommended). - Choose your FTP/SFTP credential.
- In Path, enter the directory (e.g.
/invoices/), or a nested path. - The file name is already cleaned and automatically given a
.pdfextension if missing.
If you don’t have or don’t want FTP:
- Either deactivate this node
- Or set the previous node (downloadFile) to connect directly to the next nodes, skipping FTP and subsequent Drive deletion.
4.8 Delete a file1 (Optional)
Node: Delete a file1
- Purpose: deletes the invoice PDF from Google Drive once it was uploaded to FTP and processed.
You can:
- Keep it active if you only want FTP + Sheets storage.
- Deactivate it if you prefer to keep invoices in Google Drive.
It references the uploaded file ID from GoogleDrive-upload-file, so it should work without changes (as long as that node is configured).
4.9 Delete a message (Optional)
Node: Delete a message
- Purpose: deletes the original email from Gmail after successful processing.
If you want to keep the emails in your inbox:
- Simply deactivate this node.
Otherwise, leave it enabled – it uses the message ID from Get many messages.
4.10 Extract from File1
Node: Extract from File1
- Purpose: extracts the text content from the PDF.
Configure:
- Mode:
pdf(already set in the template). - No additional configuration is usually needed.
If your invoices are image-only PDFs, you’ll need OCR support (e.g., via another service). For standard text-based invoices, this node is sufficient.
4.11 AI_Agent-fields & OpenRouter Chat Model1
Nodes: OpenRouter Chat Model1 → AI_Agent-fields
- Purpose:
- Convert text into a structured JSON object.
- Extract fields like:
invoice_number,vendor_name,invoice_date,total_amount,tax_details,line_items, etc.
Configure:
- In OpenRouter Chat Model1:
- Select your credential and model.
- In AI_Agent-fields:
- Confirm the System Message describes your extraction needs.
- It already instructs the model to:
- Return only JSON
- Include all required fields
- Ensure
line_totalvalues sum tototal_amount
You can adjust the prompt to match your country’s invoice formats, additional fields, or specific tax rules.
4.12 Code_extractFields
Node: Code_extractFields (Code node)
- Purpose: cleans and parses the raw AI output into valid JSON, handling:
- Extra backticks
- Escaped characters
- Edge cases where the model wraps JSON in text.
You usually don’t need to edit this node. It returns a clean JSON object that the Google Sheets node can consume.
4.13 GoogleSheets_save
Node: GoogleSheets_save
- Purpose: appends one row to your Google Sheet per invoice.
Configure:
- Select your Google API credential.
- Enter Document ID and Sheet Name (as described earlier).
- Verify / edit the column mapping:
Vendor←{{$json.vendor_name}}Type←{{$json.line_items[0].description}}Date←{{$json.invoice_date}}Amount←{{$json.total_amount}}
To capture more fields:
- Add columns in Google Sheets
- Add the same fields to mapping in the node.
5. Testing the Workflow
Before making it active on a schedule, test it manually.
5.1 Send a Test Invoice
- Send yourself an email from the real sender address with a sample invoice PDF attached.
- Or forward an existing invoice to yourself while preserving the from-address (if possible).
5.2 Run the Workflow Once
- In n8n, click Execute Workflow.
- Watch each node:
Get many messagesshould output your test email.Filter-contains_attachmentshould pass it through.Gmail-Get_Invoiceshould show abinaryentry containing the PDF.GoogleDrive-upload-fileshould upload a file.Extract from File1should output text.AI_Agent-fieldsshould output structured JSON.GoogleSheets_saveshould append a row.
If something fails:
- Check credentials (expired tokens, incorrect keys).
- Check sender filter (email may not match the filter).
- Check PDF: if it’s an image-only scan, text extraction may fail.
- Check the AI node for error messages (e.g., rate limits, invalid key).
6. Going Live & Maintenance
Once you’re happy with the test:
- Turn the workflow Active in n8n.
- Monitor a few runs:
- Confirm rows are being appended correctly in Sheets.
- Confirm files appear where you expect (Drive / FTP).
- Adjust the Schedule Trigger to match your needs:
- More frequent for heavy billing periods
- Less frequent if invoices are rare.
Maintenance Tips
- AI Costs: keep an eye on your LLM usage to avoid surprises.
- Credentials: refresh OAuth tokens (Gmail/Drive) as needed.
- Schema Changes: when you add new columns to Sheets, update the node mapping accordingly.
- Error Handling: consider adding an error workflow or extra logging nodes (e.g., send yourself an email if parsing fails).
7. Customization Ideas
Once the base workflow is working, you can expand it:
- Multiple Providers:
- Duplicate the email section with different sender filters
- Use a
Mergeor a single Sheets logging path.
- Tagging / Labeling Emails Instead of Deleting:
- Replace
Delete a messagewith a Gmail node that applies a label likeProcessed-Invoices.
- Replace
- Additional Storage:
- Upload to cloud storage like S3 or MinIO via HTTP or dedicated nodes.
- More Detailed Spreadsheet Data:
- Save
invoice_number,tax_breakdown, or even individual line items in separate rows.
- Save
You now have a fully documented, production-ready Automated Invoice Archiving workflow in n8n, with detailed configuration for Gmail, Google Drive, FTP/SFTP, AI, and Google Sheets. Once active, it should quietly keep your invoices organized and your spending data ready for analysis.