---
title: "Automate WordPress with Make.com: From Post to VoiceOver in the Cloud — Paolo Ronco"
language: "en"
url: "https://paoloronco.it/en/writing/automatizzare-wordpress-con-make-com-dal-post-al-voiceover-in-cloud"
---
[← writing](/en/writing)
09 April 2025 · 4 min read
# Automate WordPress with Make.com: From Post to VoiceOver in the Cloud
? GitHub : paoloronco/makecom-wordpress-ttsvoiceover-notiondb ? Publication on ReadyTensor : GCP TTS on WordPress | WordPress to Voice In the world of…
* * *
? **GitHub**: [paoloronco/makecom-wordpress-ttsvoiceover-notiondb](https://github.com/paoloronco/makecom-wordpress-ttsvoiceover-notiondb)
? **Publication on ReadyTensor**: [GCP TTS on WordPress | WordPress to Voice](https://app.readytensor.ai/publications/gcp-tts-on-wordpress-wordpress-to-voice-J5nH5EoHs9Lx)
In the world of technology and cybersecurity, **automation** is not just about efficiency but also about precision and security.
As a **Cybersecurity Analyst** with a strong passion for **tech automation**, I have developed an advanced workflow on **Make.com** that allows me to intelligently manage the entire content lifecycle on **WordPress**, transforming it into **multiformat resources** and archiving it in an organized manner across multiple platforms.
In this article, I show you **how my workflow works**, what makes it effective, and how it can be adapted to other contexts, always with a focus on **scalability and security**.
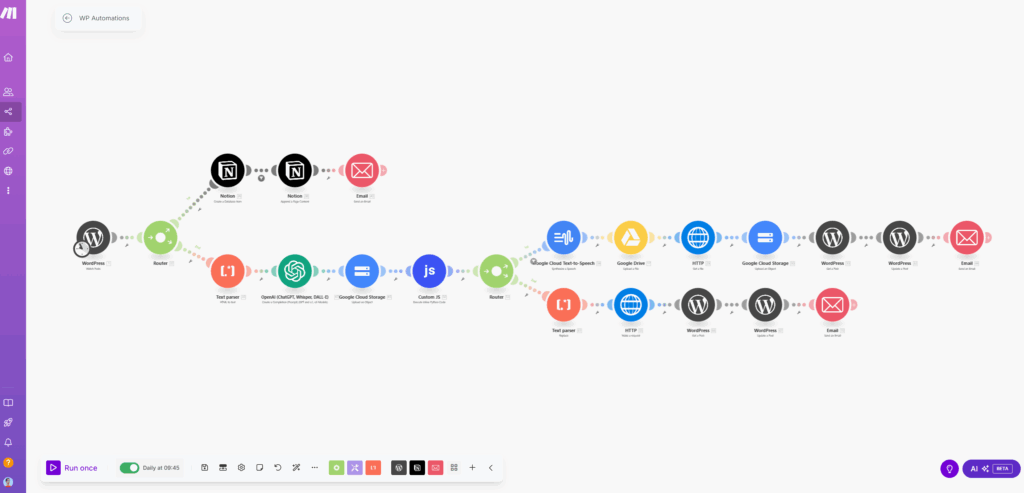
## ? Workflow Objective
Automate the management of posts on WordPress in two directions:
- **Structured storage and notification** (via Notion and Email),
- **Automatic generation of voiceover audio** and dynamic update of the post on the site.
## ? Overview of the Process
### Step 1 – Watch Post from WordPress
The flow is triggered every time a new post is published (or updated) on WordPress, thanks to the “Watch Post via API” module.
### Step 2 – Router
The router splits the flow into **two independent branches**, which perform parallel operations on the same content.
## **Branch 1 – Storage in Notion Database**
1. The post content is **added to a Notion table**, useful for tracking, future consultation, and content management as a knowledge base.
2. At the end, an **email notification** confirms the correct insertion of the post.
✅ **Useful for:** structured backup, content history, internal documentation.
## **Branch 2 – Generation of VoiceOver Audio**
### 1\. **Text Parsing and Optimization**
- The post content is converted from HTML to clean text.
- The text is then **optimized and reformatted** using an **OpenAI GPT model**, to improve readability and prepare it for voice synthesis.
### 2\. **Upload to Google Cloud Storage**
The text is uploaded in `.txt` format to a private bucket on GCP.
### 3\. **Control with Custom JS**
A custom **JavaScript script** checks the **generated file size**:
- If it is **less than 5000 bytes**, the text is short → use standard TTS synthesis.
- If it is **greater**, a longer voiceover path is activated.
The JavaScript code returns a boolean value that is handled by a second router.
### 4\. Router: Choice Between Short and Long TTS
#### If the text is < 5000 bytes:
1. The file is sent to the **Google Cloud Text-to-Speech module** to generate the `.wav` audio.
2. The audio is uploaded to **Google Drive**.
3. It is downloaded via an HTTP module and then **re-uploaded to a public GCP bucket**.
4. The updated post content on WordPress is retrieved.
5. The new audio is **integrated within the post** with a **custom HTML block** (see example below).
6. Final email confirmation.
#### If the text is > 5000 bytes:
1. An **advanced Text Parser** is applied that removes special characters and further cleans the content.
2. An HTTP module activates a **Cloud Run Function on GCP** to generate a **long voiceover**.
3. In this case as well, the post content is retrieved, updated with the new audio, and a final email notification sent.
## Audio Integration on WordPress
The audio is automatically added to the post with this HTML snippet:
htmlCopiaModifica`
? VoiceOver: {{1.title}}
Data: {{66.date}}
Link articolo: {{1.link}}
PostID:{{1.id}}
`
This allows users to **listen to the content directly on the page**, making the blog **accessible, enjoyable, and modern**.
## Security & Best Practices
Given its articulated nature, I have paid **maximum attention to security**:
- Use of API keys, OAuth, and tokenized access,
- Strictly controlled permissions for Cloud Storage buckets,
- JS logging for internal controls and fallbacks,
- Modularity and full traceability of each step.
Every step is **verifiable**, idempotent, and can be isolated during debugging.
## ✅Conclusions
This workflow is the result of months of optimization and real-world testing.
It allows me to **publish content on WordPress** and, without any manual intervention:
- **archive it**,
- **improve it**,
- **transform it into audio**,
- **and make it publicly available**.
It is a solution that combines **intelligent automation** and **cybersecurity awareness**, designed for those who work with content and want to save time without sacrificing control.
If you want to implement something similar, or discuss automations for your stack, **write to me!**
On this page
- [? Workflow Objective](#-workflow-objective)
- [? Overview of the Process](#-overview-of-the-process)
- [Branch 1 – Storage in Notion Database](#branch-1--storage-in-notion-database)
- [Branch 2 – Generation of VoiceOver Audio](#branch-2--generation-of-voiceover-audio)
- [Audio Integration on WordPress](#audio-integration-on-wordpress)
- [Security & Best Practices](#security--best-practices)
- [✅Conclusions](#conclusions)